Elevate Your DIY Video Projects: Expert Tips for Professional Quality
Introduction to DIY Videography
Creating your own video content can be incredibly rewarding, whether for personal use or corporate presentations.
However, many DIY video projects often lack the polish of professional productions.
At Skillman Video Group, we believe anyone can elevate their in-house video projects with the right techniques.
From stabilizing footage to mastering lighting and composition, our expert tips will help you produce high-quality videos that captivate your audience and convey your message effectively.
Table of Contents
Tip 1: Stabilize Your Footage
One fundamental aspect of producing quality video is ensuring your footage is stable.
While holding a camera steady is an art in itself, professionals use a variety of tools to minimize shaking.
Our simplest advice is to invest in a good tripod.
A tripod can stabilize 90% of your shots effectively.
Even for shots that require movement, using a tripod as a counterweight can help maintain a smooth flow, preventing jittery results that can distract from your video’s message.
Tip 2: Mastering Lighting Techniques
Good lighting is crucial to creating visually appealing videos.
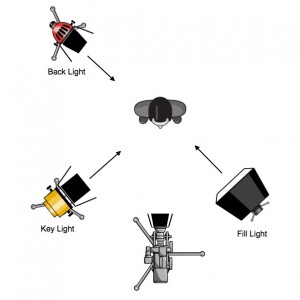
The standard setup, known as three-point lighting, includes a key light, fill light, and edge light.
The key light is your primary light source, while the fill light helps soften the shadows created by the key light, reducing harsh contrasts.
It’s essential to balance the fill light to avoid flattening your subject entirely.
The edge light, or backlight, adds depth by highlighting the subject’s edges, helping them stand out from the background.
Additionally, managing the highlights and shadows in your environment is crucial to retaining detail and texture in your footage.
When possible, choose to film in well-lit conditions to avoid the noisy, grainy output that often results from high camera gain in low-light scenarios.
Tip 3: Composition Using the Rule of Thirds
The Rule of Thirds is a powerful compositional technique in photography and videography.
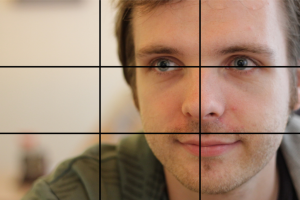
By dividing your frame into a grid of nine equal segments—three horizontal and three vertical lines—you can create more engaging visuals.
Place your subject along these lines, ideally at the intersection points.
For example, position the subject’s eyes along the top horizontal line while aligning them on one of the vertical lines to give “speaking space” in the direction they are looking.
This technique can be utilized effectively at any distance and helps draw the viewer’s eye into the composition, making your footage more dynamic and engaging.
Additional Tips for DIY Video Success
When embarking on a DIY video project, also consider the sound quality, which is just as important as your visuals.
Poor audio can distract from even the most beautifully shot video.
Using an external microphone rather than your camera’s built-in mic can drastically improve sound clarity.
Furthermore, when planning your shots, think about the background and setting.
A cluttered or distracting background can detract from your subject, so choose a setting that complements rather than competes with your primary focus.
Final Thoughts and Resources
With these tips, you’re well on your way to producing higher-quality DIY videos.
Remember, practice is key to improving your videography skills.
Be patient with the process and experiment with different techniques to find what works best for your specific needs. For further guidance, especially in editing your footage, be sure to refer to our comprehensive post-production guide.
Good luck with your video projects!
Frequently Asked Questions
How can I stabilize my video footage for a professional look?
Stabilizing your footage is crucial for creating high-quality videos.
The simplest and most effective tool for stabilization is a tripod. A tripod can keep your shots steady, reducing the distracting shake that often occurs with handheld filming.
For shots that require movement, using a tripod as a counterweight can help maintain smooth motion. Additionally, practicing steady hand techniques and investing in stabilizers like gimbals can further enhance your footage’s stability.
What are the key lighting techniques for DIY videography?
Good lighting is essential for visually appealing videos.
The three-point lighting setup, which includes a key light, fill light, and edge light, is a standard technique. The key light serves as the primary light source, the fill light softens shadows, and the edge light adds depth by highlighting the subject’s edges.
Balancing these lights properly helps create a well-lit scene that emphasizes your subject while retaining detail and texture.
Filming in well-lit environments also helps avoid grainy footage caused by high camera gain in low-light conditions.
How does the Rule of Thirds improve video composition?
The Rule of Thirds is a powerful compositional tool that can make your visuals more engaging.
By dividing your frame into nine equal segments using three horizontal and three vertical lines, you can place your subject along these lines or at their intersections. This technique draws the viewer’s eye into the composition and adds dynamism to your footage.
For instance, aligning a subject’s eyes along the top horizontal line and placing them on one of the vertical lines gives a natural look and speaking space in the direction they are looking.
Why is sound quality important in DIY videos, and how can I improve it?
Sound quality is just as important as visual quality in video production. Poor audio can distract from even the most beautifully shot footage.
Using an external microphone instead of your camera’s built-in mic can drastically improve sound clarity. Positioning the microphone closer to the subject and minimizing background noise will further enhance audio quality.
Ensuring clear, crisp sound helps keep your audience engaged and enhances the overall professionalism of your video.
What additional tips can help make my DIY video projects successful?
Beyond stabilizing footage and mastering lighting and composition, consider the setting and background of your shots.
A cluttered or distracting background can detract from your subject, so choose a setting that complements rather than competes with your primary focus. Planning your shots in advance, practicing regularly, and experimenting with different techniques will also help improve your videography skills.
Additionally, investing time in post-production, such as editing and color correction, can greatly enhance the final product. For more detailed guidance, refer to comprehensive post-production resources.
Share:
Search our blog:
Follow us on:


